Thursday, May 29, 2014

       Raw Mango Sambar is an easy to  make one vegetable sambar. You could add more veggies if you like but here i am sharing with you the simple version of this Mangai Sambar prepared in Tamil Nadu. I have given the recipe to make this sambar super easy. But you can do tempering separately and add at last with the sambar.

      Raw Mango gives nice flavour and tangy taste to the sambar. Mangoes are abundance and cheap in this mango season. So we can make this delicious sambar to relish our taste buds at this season. You can make this sambar with any variety of Mango. But the Dhothapuri variety gives very nice taste with this sambar.


INGREDIENTS:

Raw Mango, Dhothapuri (Kili mooku)- 2 (one mango cut in to 6 pieces)
Toor dhal- 1/2 cup
Onion- 1 large
Garlic-2 cloves
Tomato- 1 large/ 2 small
Tamarind - small lemon size
Turmeric powder- 1/2 teaspoon
Chilli powder- 1 teaspoon
Coriander powder- 1½ teaspoon
Coriander leaves- 3 teaspoons

To temper:
Oil- 3 teaspoons
Mustard seeds- 1/2 teaspoon
Fenugreek/ Methi seeds- 1/4 teaspoon
Cumin seeds- 1/4 teaspoon
Curry leaves- 1 strand
Asafetida- pinch


PROCEDURE:


  • Heat oil in a pan and add the mustard seeds once it starts to splutter add the fenugreek seeds and cumin seeds. Roast the fenugreek seeds till it becomes light brown colour. Do not allow them to turn dark brown in colour, it makes sambar bitter.
  • Now add the curry leaves and asafetida.
  • In that oil add the chopped onion, garlic and cook till light brown colour.
  • Add the tomatoes and little salt and cook till mushy.
  • Add the tamarind juice and masala powders turmeric powder, chilli powder and coriander powder.(or you can add some sambar powder too. I have not used here)
  • Cook till the raw taste of tamarind and the masala smell leaves and oil separates on top.
  • Now add the mango pieces and allow to cook. It takes about 3-5 minutes to cook. Check by pressing a piece with hand the pulp should be soft to touch and glossy.
  • Now add the cooked dhal and mix well without damaging the mango pieces.
  • Allow to boil for a minute and check for salt and add coriander leaves and curry leaves and switch off the gas.


Tuesday, May 27, 2014

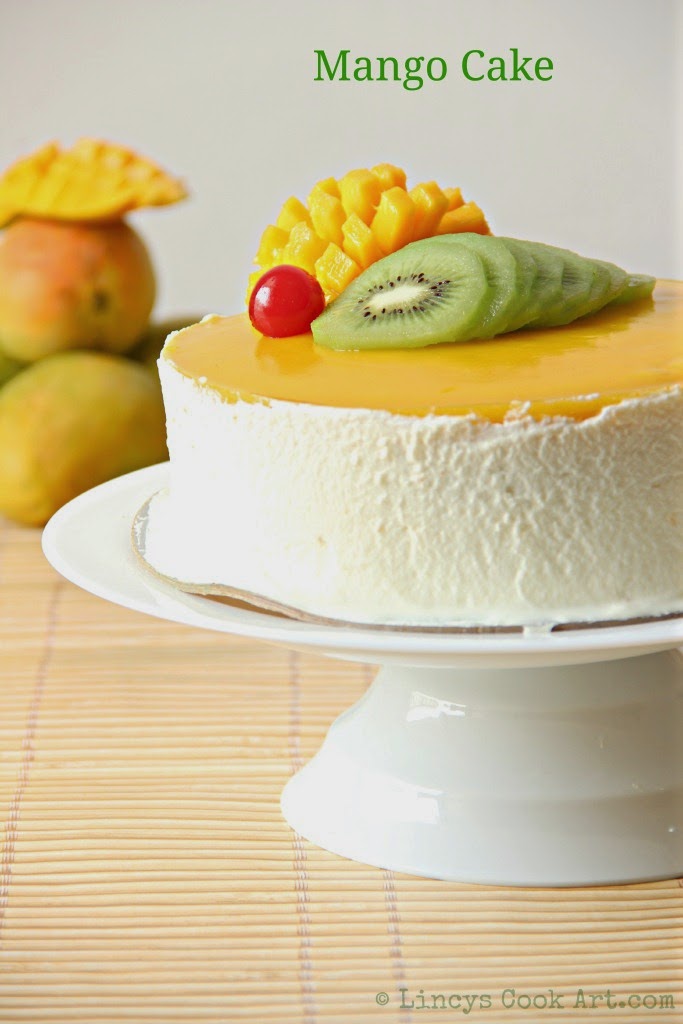
       Mango cake is a real tasty one. I have made mango sponge cake and put together with whipped cream frosting and topped with Mango jelly and fresh fruits. As the mango season has started we can get mangoes in cheaper rates and it the perfect time to make this cake.

      Mango flavour dominates this cake and the cake is so moist. You could use fresh mangoes, tinned frozen mango puree also to make this cake. Adjust the sugar level according to the mangoes you use to make this cake. Top this cake with the fruits of your choice. I have made here egg less version. If you are planning to add eggs replace the yogurt with 2 eggs and proceed with the same instructions.

Mango Cake

INGREDIENTS:

Mango Sponge Cake:

*All purpose Four/ Self raising Flour- 1 ½ cups
Butter, melted- 1/2 cup
Sugar- 1 cup
Yogurt- 1/2 cup (For egg less version) (or) Eggs-2
Mango Puree- 1/2 cup(fresh mangoes/tinned)(I used Alphonso variety)
Baking Powder- 1 teaspoon
*Baking Soda- 1/2 teaspoon
Salt- pinch
*Do not add Baking Soda if you are using Self raising flour.

Frosting/ Icing:
Whipping cream- 250 ml (1 cup)
Sugar- 2-3 teaspoons

Mango Jelly:
Mango puree- 1/4 cup
Sugar- 1 teaspoon
Gelatin/ China grass- 1 teaspoon
Water- 1/4 cup

Frosted Mango Cake

PROCEDURE:
  • Preheat the oven to 180 degrees for 15 minutes.
  • Grease and flour the pans or line with wax paper.
  • In blender puree the mangoes.
  • In another bowl add melted butter and sugar and beat using a electric beater till the sugar dissolves.
  • Now add the yogurt and beat till it forms lightly creamy.
  • Add the mango puree and mix till combined.
  • Now add the baking powder, baking soda and flour half a cup at a time and mix/ fold well until the the whole flour mix finishes.
  • If you feel the batter is thick sprinkle little milk and mix well.
  • Transfer the batter inside the prepared 18-20 cm two baking trays and level the top.
  • Bake inside the preheated oven for about 30 -40 minutes or until the skewer inserted comes out clean.
  • Unmould one of the cake and keep another cake inside the cake mould to set the mango jelly on top over the cake(set the jelly immediately inside the freezer as it may seeps down the cake) or spread a layer of icing on top and pour the jelly.
  • For Jelly:
  • Puree mango with sugar in a blender as a fine paste.
  • Sprinkle gelatin over quarter cup of water in a thin layer till it finishes and allow to bloom inside the water.
  • Once it double its volume melt this gelatin inside the oven till it dissolves around 30 seconds or cook on top of stove till dissolved.
  • Add the gelatin mixture with mango puree and mix well with spoon and pour over on top of the one of the cakes inside the cake tin.
  • You can also use by soaking china grass in water above mentioned and cook the china grass till dissolved and set the jelly.
  • Now you will have a plain mango cake left with out jelly going to be used as the base or bottom layer of the cake.
Icing:
  • Chill the whisk, bowl and the whipping cream for about 15 minutes.
  • Whip the cream by adding 2 teaspoons of sugar till you get the stiff peaks.
  • Cover the bowl with cling film and refrigerate till you use it.
Assembling the cake:
  • Take a hard board and draw 20 cm diameter line and cut the board and cover with aluminium foil and cut the foil to approximately 22 cm diameter. Fold the excess 2 cm on opposite side and stick with a tape.
  • Using pastry brush crumbs sticking over the cake.
  • Keep a teaspoon of frosting on the cake board and keep the first cake.
  • Apply 2-3 tablespoons of frosting and spread evenly on top of the cake. Keep the second cake and slightly press with hand.
  • Keep the cake with mango jelly on top and finish the sides of the cake with the frosting.
  • First apply a thin layer and chill for about 15 minutes and apply a thick layer.
  • Garnish top of the cake with cut fruits of your choice mango pieces, kiwi, cherries ..etc as per you wish.
Mango Sponge Cake


Sunday, May 25, 2014

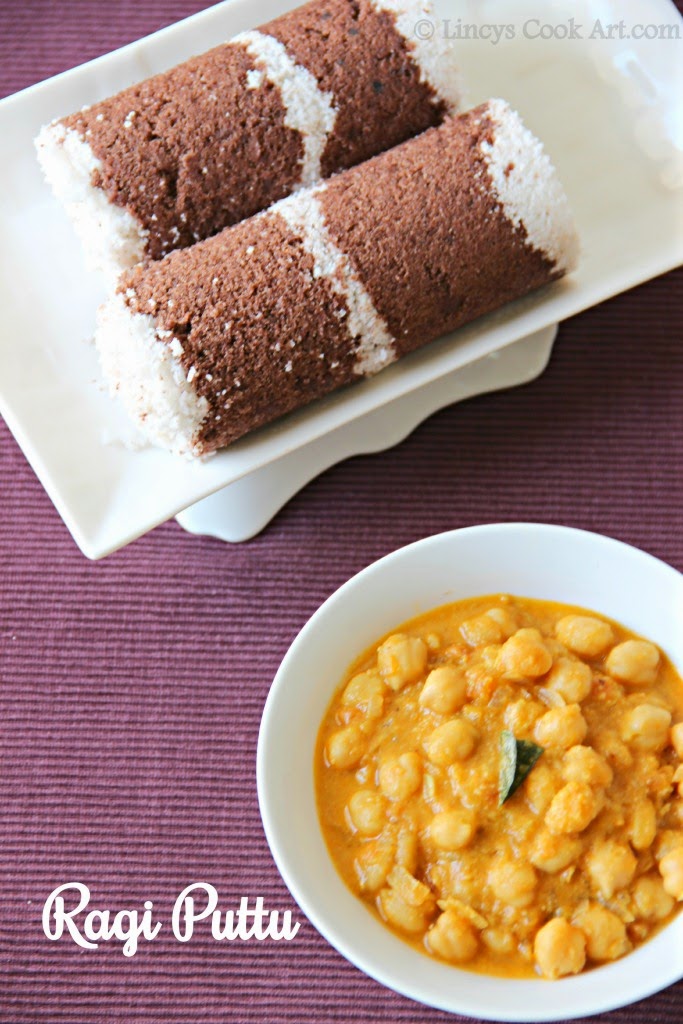
       Ragi is rich in many nutrients and provides Calcium for growing children and older adults helps improving bone strengthening, good energy source for weight watchers it gives the feeling of fullness when consumed,it beats high sugar and cholesterol.

       This puttu is a super easy puttu and if it is consumed with White/ Black channa curry (Kadala Curry) gives a complete nutritious wholesome meal with necessary carbohydrates, proteins and minerals necessary for our daily diet. I prefer White channa curry than Black channa curry especially for this puttu. Really tasty and also a healthy variation for the normal puttu can be eaten without any guilt. You can add very little coconut if you donot like to add coconut.

Ragi Puttu

INGREDIENTS:

Ragi Flour, roasted- 2 cups
Salt- to taste
Coconut- 4 tablespoons

PROCEDURE:

  • If you do not get the roasted ragi flour take the flour and roast it on a low flame till you get the roasted smell of the flour.
  • Transfer the roasted ragi flour in a bowl and add salt and water(unlike normal puttu it requires less water) and mix well with hand and wet the whole mixture. It forms some lumps also. Donot worry.
  • Add the whole lot into a blender and pulse for two three times. Now you get the wet sand kind of powder without any lumps.
  • In puttu maker cylinder keep the grating(Chillu), then add grated coconut, followed by two hand full of wet ragi powder then again layer with grated coconut then repeat the ragi powder layer and top it with coconut. Likewise fill alternatively the whole puttu cylinder.
  • Close the cylinder with lid and keep on top of boiling water inside the puttu vessel, steam for 5-7 minutes till the steam comesout from the lid holes of the cylinder.
  • Note: This puttu can be made with chirata puttu maker or even made inside the idli steamer by spreading the wet ragi powder on top of a white cloth too.

Makes 2 cylinders(kutti) full of puttu.
You might also like my similar Healthy Puttu versions Oats Puttu, Carrot Puttu, Banana Puttu.


Friday, May 23, 2014

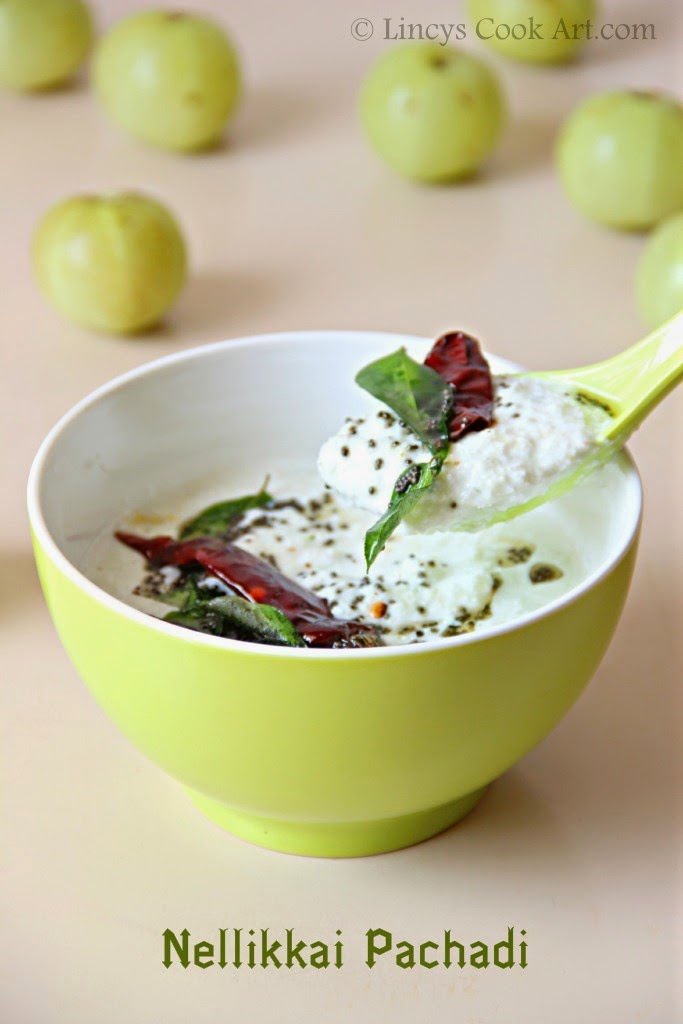
       Gooseberry is rich in iron and it has a wide range of health benefits. Regarding this pachadi, it is so easy to prepare with the limited number of ingredients. As the summer is showcasing its heat the gooseberry and the yogurt combo gives cooling effect to the body. Except tempering no cooking is involved in the preparation of this delicious pachadi.

       The sour taste of gooseberry with ginger gives superb taste to the dish. Make this dish often at home and keep your family members healthy and fit.

Nellikkai Pachadi

INGREDIENTS:
Gooseberry/ Amla, chopped- 6 nos (big)
Green chillies-1-2
Ginger- 1/2 inch
Curd/ Yogurt- 1 cup
Salt- to taste

To Temper:
Oil- 2 teaspoon
Mustard seeds- 1/2 teaspoon
Curry leaves- 1 strand
Dried Red Chilli-1
Asafetida/ Hing- pinch

Gooseberry Pachadi

PROCEDURE:
  • In a blender jar add the chopped (seeds removed) gooseberry, green chillies and ginger.
  • Pulse twice or thrice to coarsely blend them. Do not make as fine paste.

  • Beat the curd with salt and add with this gooseberry mixture.
  • Heat oil in a pan and add mustard seeds, once it splutters add the dried red chilli and curry leaves; add the asafetida and immediately switch off the gas.

  • Mix well the tempering with the gooseberry curd mixture. Check for salt and serve with rice and curry.
  • Notes: You can use 2 tablespoons of coconut if you wish to add while grinding.
  • Do not add salt while grinding. Add only with yogurt or after adding yogurt. Before adding may turn the gooseberry lightly brown in colour.


Tuesday, May 20, 2014

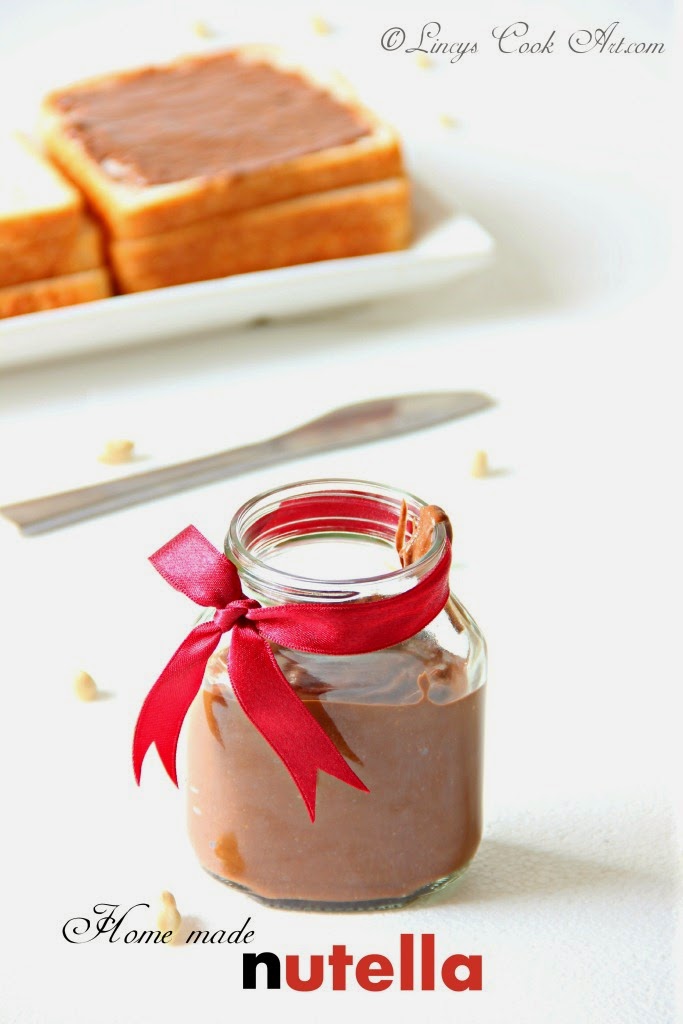
       Nutella is a favourite spread for all people without any age difference, country or region difference. This is so versatile and it has been used not only as spread but also used in making various dishes like biscuits, cakes, frosting on cakes, ice creams, milkshakes..etc. This Nutella is basically a 'Chocolate Hazelnut Spread' or in other words we can say this as 'Chocolate Hazelnut butter spread'.

       I have replaced Peanuts in the place of Hazelnuts. Because it is easily available, cheap and also so tasty. I could say i have not felt much difference in taste or in texture. If you don't tell people this as Chocolate peanut spread, no one identifies the taste difference i promise. A real cheap and easy and also worthy dish to try. Without any preservatives any home made dish is always better. Worth the trial. Sure, try this at your home and make your family members happy.

       Three years back i have tried this spread with hazelnut and cocoa powder. I had added less butter in it. So i got the slight raw taste of cocoa in my spread. After that i have not made this for long time. This is a easy to make method. If you are going to try this with cocoa powder, melt butter then add cocoa powder and add some milk and cook till the raw taste of cocoa leaves then proceed with the same recipe.

Home made Nutella

INGREDIENTS:

Roasted Peanuts- 2 cups
Oil- 2 teaspoons
Salt- 1/4 teaspoon
Honey- 1½ teaspoon
Semisweet Chocolate Chips- 3/4 cup

Chocolate Peanut Butter


PROCEDURE:
  • Roast the peanuts in a broad pan until you get the popping sound of some peanuts and light brown colour spots appear on skin.
  • While roasting toss and mix the nuts for every 15 seconds to allow even cooking.
  • Or else spread the peanuts in a baking pan lined with aluminium foil and roast them in 180 degree oven for about 30-40 minutes. Once it reaches 15 minutes toss and mix the nuts and keep for roasting for even cooking.
  • Allow the nuts to cool and de-skin them.
  • Add the nuts inside the blender and add salt, oil and honey.
  • Blend well and scrape the sides and again blend well till it gets the peanut butter consistency.
  • First the nuts break and then again grind and form like a ball then it automatically breaks down and starts to melt and get the peanut butter consistency. Stop at this stage and add the chocolate chips.
  • The heat from the blender while grinding is enough to melt the chocolates. So grind for about 2-3 minutes or until the chocolates melts on heat and combine with the peanut butter uniformly. scrape the sides and blend if needed.
  • Now you get the consistency of Nutella kept in Room temperature. You can compare with original nutella if you have at home. I have compared and i did not feel any difference.
  • If you want thick spread refrigerate for a while and use.
  • Yields around 1- 1¼ cups of spread.
  • Note:
  • You can keep this at room temperature for a week and refrigerate and use it for a month or more.
  • You could replace semisweet chocolate chips with Dark chocolates too to make it in a healthy way. Break the chocolate bars in to small pieces or grate them or melt them in a double boiler add use for this recipe.
  • You could use milk chocolates too for this recipe but it turns the spread little too sweet.


Monday, May 19, 2014

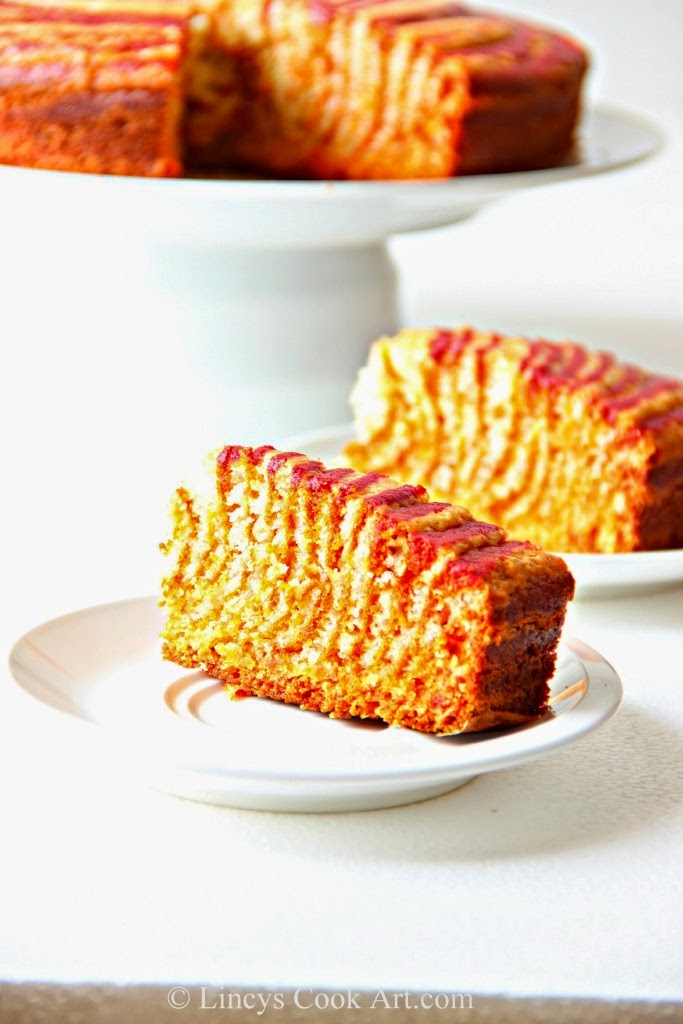
       My previous Zebra Cake recipe with Chocolate and Vanilla theme was liked by all and almost the whole cake was completed by my kid. I understood that he liked the pattern in the cake. In his school they used to have week a colour of food or vegetable as a theme. So I had planned to make this cake for the Red Themed week for his snack box in a healthy way by adding Beetroots in the place of chocolate batter and the outcome was satisfying. I was happy that my imagination worked out well finally.

       I am making this cake egg less version and if you want to add eggs in it avoid yogurt and instead add 2 eggs. I have added lemon juice and zest to give nice flavour for my cake. This cake is Beet root and Lemon flavored Zebra cake. Normally Red Velvet cake has a mild mix of cocoa in it, but since my earlier Zebra cake was with cocoa, i have avoided using any cocoa here (you may add a tablespoon of cocoa if you want).

Red Velvet Zebra Cake

INGREDIENTS:

*All Purpose Flour/ Self Raising Flour- 1 1/4 cup
Beet root- 2 small (1/2 cup puree)
Oil- 1/2 cup
Sugar- 1 cup
Thick yogurt, beaten- 1/2 cup
Salt- pinch
Baking powder- 1 teaspoon
*Baking Soda- 1/2 teaspoon
Lemon-1(juice and zest)
* Do not add baking soda if you are using Self Raising Flour.


PROCEDURE:

  • In a bowl add oil and sugar and whisk using electric hand mixer or a wire whisk till the sugar is almost dissolved.
  • Add yogurt and whisk till combined well.
  • Now add baking powder and *Baking Soda (Do not use if you are using Self raising  Flour); Mix well
  • Add the lemon juice and zest.
  • Immediately add the All Purpose Flour/ Self Raising Flour 1/2 a cup at a time and mix/fold well.
  • Divide the dough into equal parts.
  • In one half add the beetroot puree and mix well until uniformly combined. Now this batter will be little loose(thinner than white batter) in consistency.
  • If the white batter(other half) is thick add more lemon juice to make it thin so that the batter drops from spoon easily.
  • To make the beet root puree, Pressure cook the beet root till soft around 2-3 whistles.
  • Peel them and roughly chop them and puree them as fine paste without adding any water.
  • Preheat the oven to 180oC.
  • Take a 20 cm baking pan and line with wax paper or grease the pan with oil or butter and dust with flour and shake off the excess flour.
  • At the centre of the pan add a tablespoon of white batter then add the beet root batter at the centre of the white batter. Like wise add the whole batter inside the pan in alternative manner till you finish the whole batter.
  • When u add the whole batter in that manner it spread and reach the whole tin in thin layer once u bake the cake, it raises and gives zebra appearance.
  • Bake the cake for about 40-45 minutes or until the skewer comes out clean.
Checkout other variants of this cake;


Like us on Facebook

Biryani and Pulao Recipes

25+ Dosa Recipes

Translate

Instagram
my foodgawker gallery
myTaste.in Tasty Query - recipes search engine

Food Categories